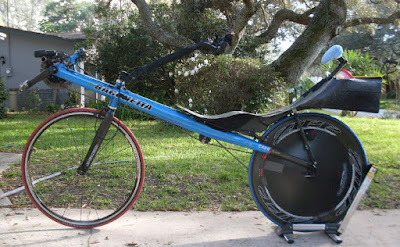
Friday, December 30, 2016

Cycling as a Priority

While training today I found myself tired, sore, cold and wet.  Asking myself the important question: worth it or not worth it?  And the essential corollary: is cycling a priority?

Ranked in priority:
  1. Wife
  2. Family
  3. Work
  4. Political Activity (Trump is a threat to all that the U.S. Constitution stands for)
  5. Cycling
And, if cycling is last of the list of 5 it is certainly got a big `footprint' in my weekly life:  time, effort and intensity.  

Living up here in the Arizona mountains and having nothing remotely resembling level ground makes training ... complicated.  I don't like even the `idea' of driving tens of miles to find terrain that is warmer, flatter and drier.  

An hour and a half away (and 4,000 feet lower, and 20F degrees warmer) means I have a 3 hour commute.  Vulture Mine Road  Vulture Mine Road is an excellent training course for several reasons: good road, almost no traffic, a mix of level and hills, no ice or snow.  But it ... is 3 hours away.  

Nearby (literally right outside my door) is some of the most challenging terrain I know of.  Prescott High Country  Again, the roads are smooth, traffic is minimal, most drivers are regulars (I often get a `wave' as they go by).  But the altitude makes for ice and snow.  And a climbing experience requiring preparation and serious consideration.

Over the past few weeks I've focused on a `high country' course with good road, wide shoulders and minimal traffic.  But it is a `killer':  Prescott - Kirkland Junction - Out and Back  The return leg is 25 miles and 3,400 feet of climbing, getting steeper (7 - 11% grades) as you reach the top end of the course. I have to dress for freezing wind chill (descending into 35F at up to 50 mph for 13 miles), `warmer' low country, and sweaty climbs back up.  

But it is GREAT training. 

Friday, December 23, 2016

Cold Weather Clothing

We're supposed to get 8 inches of snow tomorrow so more `clothing' testing will be delayed for a few days.

Where I live one is either climbing or descending.  Nothing is remotely flat, or even `flattish.' Today's training session is the classic example.

https://ridewithgps.com/trips/12333556
 
A 12.2 mile descent with 2,000 feet elevation loss. At 6014 ft elevation I started out in a grey cloud fog, making any eye glasses or eye gear useless (lenses fogged up on inside and had obscuring rain drops on outside).


Descending at 42 mph into a 12 mph headwind at 43F on wet (though excellent) road made for careful going. The National Weather Service [url="https://www.weather.gov/epz/wxcalc_windchill[/URL] windchill calculator puts the windchill figure at below 30F. Which I don't accept. Perhaps the rain and fog, being wet, made it feel more like in the mid-teens.


I wore


  • Armwarmers made from woolen tube sox ($6 compared to $35 brand armwarmers).
  • A merino wool long sleeve jersey.
  • Two merino wool short sleeve jerseys.
  • My favorite low tech Giordana clear plastic rain jacket (and wind shell).
  • Two pairs of gloves (Coolibar fingerless and a no-name full fingered wool set).
  • A balaclava with a thin cotton skull cap.
  • Polypropylene leggings.
  • And a simple pair of Aerotech Design shorts.


All tight and tucked for the extended descent (37 minutes).

On the climb back up the balaclava, second pair of gloves came off. And I unzipped the jerseys. Still no glasses.


As I got above 5,200 feet (and colder and foggier) the second pair gloves came back on and I zipped up. 


It was quite a fashion show.

Thursday, December 22, 2016

Wet, Windy, Wild Way to Climb My Way into Winter.

A fitting way to start the winter. 

3,488 feet of climbing on the 25 mile return leg of a 50 mile out and back.  Most of the climbing done in the last 13 miles of the route.  


Temp dropped 20F, a driving rain, cold SE crosswind the last 15 miles of climbing. Lots of 8+% grades. Road excellent. I felt like I had been in a fight - and won - by the time I finished. 

The descent wasn't as boring as it usually is because of the challenge of the driving wind and rain.  Still, managed to push 48+ mph for a good bit.  The steeply reclined (4 degrees) position, use of the ``Luge / Bobsled' ' position , the Railgun seat, tiller and `handlebar on my chest' technique delivered the results I want.  


Friday, October 28, 2016

Modified Handlebar on Tiller


The mini bullhorn handlebar that I used on the tiller was not `mini' enough.  The steering with the tiller and mini bullhorn was rock solid, nonetheless.  Brakes, R2C levers ... excellent.  

In order to reduce wind drag and to make it even more comfortable I reduced the width of the bullhorn handlebar by 60 mm, i.e., 30 mm from either side of the section onto which the tiller clamps.  I then had it welded together again. 

The pic above is the before and after.  

Wednesday, October 26, 2016

Sliding Down the White Spar

I think I'm in the final stages of recovery from a three week bout of the most mysterious flu.  Started out like most flu episodes (head filled with snot, coughing), then moved into laryngitis and finally persisted as two weeks of low energy and high need for sleep.  

With ten days to a 12 hour time trial at Borrego Springs I finally got back on the bike for a quick up'n'over the Bradshaw mountain on the White Spar.  

Kept it low and slow most of the way.  The conditions were good for fast descents, though.  On the last 2.5 miles of the ride it is all downhill and switchbacks.  Glass smooth road.  Posted speed limit ranges between 30 - 45 mph.  

As I began the descent I noted a car about 30 yards behind me preparing to pass.  Usually I just pull over and wave the vehicle past so that I don't have to deal with the hassle.  This time, however, I was having just too much fun, and knowing I wasn't going to overtrain on the descent.  So I pushed it.  

Riding the Spars 

For the first 100 yards I pedaled hard to get to `escape velocity.'  Then I assumed the `luge' position and took advantage of the 4 - 6 degree angle of descent.  With the combination of the luge and tucking tightly I was able to accelerate to 45 mph as I approached the first `gentle' curve.  The car behind became distant as it complied with the 30 mph limit.  

For the next mile I continued the luge and the tuck.  When my speed reduced to 38 mph I engaged the pedals again and cranked hard and fast (115-120 rpm due to the fact that my big ring on the Ti Aero is only a 50t).

I expected the car behind to pass me but I think he was having a good time watching me have a good time.  He stayed well behind me all the way to the end.  

That was fun. 

Friday, October 7, 2016

Tiller and Stem: Bacchetta Stick Bike

A year and a half ago I modified my Ti Aero and CA2 steering setup from a stock riser and handlebar to a tiller and stem.  

This is a pic of the stock riser and handlebar setup: 


I found that the riser impeded my ability to see ahead of me.  That was the primary basis of my interest in the Cruzbikes.  This is a pic of one of the three (Vendetta, Silvio and Sofrider) Cruzbikes I owned (Silvio): 

The front wheel drive of the Cruzbike is problematic for me for several reasons I won't describe here.  I returned to the Bacchetta stick bike frame and rear wheel drive.  

I then became interested in a different bike that had both a tiller setup and rear wheel drive, the M5 Carbon High Racer (pic): 


But I chose against this bike for two reasons: didn't want to spend the money and the chain interferes with right hand turning (wheel hits the chain).  In my terrain the fast, descending switchbacks would pose a problem with the chain / wheel issue.  

My compromise response was to modify the Bacchetta bikes I have to obtain a) the tiller and stem setup, b) a much more reclined seat, c) retain the rear wheel drive.  This is a picture of Kent Polk's initial use of the tiller, stem and custom make reclined carbon fiber hard shell seat: 

I ordered from Kent the Railgun seat for both my Bacchetta bikes.  It makes a profound beneficial difference.  I then ordered the tiller and stem setup from Performer Bikes in Taiwan.  

Others using the Performer Bikes tiller and stem modified it so that it angled down to the level of recline the rider wants for the Railgun seat.  So that the tiller stops, and doesn't land in your lap, others had drilled a hole in the stem and inserted a strong bolt.  This is a pic:  


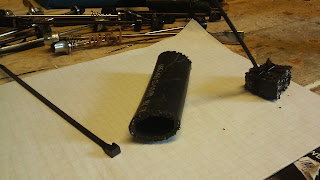
Two things to note on the picture above.  First, in order to get the angle at which the tiller `fits' the rider's preference I had to tap several holes, experimenting.  Second, given that I didn't want the strong bolt hitting the stop point on the stem (metal on metal) I had to `cushion' the stop point with pieces of strong rubber, lashed to the stem with cable ties.  

Quickly I concluded that the bolt, rubber and cable ties was not a long-term solution.  In fact, after a long and dangerous cycling event (Hoodoo 300) the bolt simply fell out on a training ride.  

To eliminate this problem I welded a piece of aluminum to the tiller and welded an aluminum channel into which I inserted a `soft' stop (again, strong rubber):  


I am able to adjust the angle at which the tiller stops simply by adjusting the length of the rubber inserted into the stem channel.  The rubber is firm and snug in the channel eliminating the possibility of falling out.  

You will also note that I welded the tiller itself to the stem.  Previously it had been attached to the stem with a simple seat clamp.  That is problematic.  The seat clamp can loosen and the tiller and handlebars can swivel, completely eliminating steering control.  


Thursday, September 8, 2016

Hoodoo 300 - A Report

A week and a half ago I entered the Hoodoo 300 24 hour race in Utah.  http://hoodoo500.com/300-2/

I completed 250 miles and 15,500 ft of climbing in 22 hours before I ended it.  I knew I couldn't finish the last 50 miles before the time limit (24 hours) and there was no reason to put my excellent crew through the `drag' of me grinding away for another 4 hours just to do 300 miles.  


I am really very pleased with my performance on the HD300.  And I could not have had a better crew.  I have to say that again:

I COULD NOT HAVE HAD A BETTER CREW
  • Allan Duhm, Crew Chief - Crew 2
  • Billy Befoot, Mechanic - Crew 2
  • Mike Cash, experienced RAAM Crew person and Mechanic - Crew 1
  • Paul Gagnon, Crew person and Domestique par excellence - Crew 1

Two vehicles.  Crew 1 followed me, leapfrog, to the halfway point (155 miles, 9,000 ft of climbing, Panguitch, Utah).  Crew 1 then `turned me over' to Crew 2 for the last half.  

I arrived at the halfway point in 12 hours, 2.5 hours ahead of schedule (per my conservative plan).  It rained literally the entire 150 miles.  Heavy weekend RV traffic almost the entire way.  My crew was amazing, providing me food and hydration, minor mechanical help and a heap of a lot of encouragement.  

At Panguitch we attached night lights and headed off to the most difficult section of the course, 31.5 miles and 4,400 feet of climbing.  I had scheduled to do this in 4 hours but it took me 6 hours.  I fell off the bike 6 (maybe 7) times in the last 12 miles, as the grade increased to steady 6% - 8%+.  I was going too slow, I wandered back and forth on the road, finally just tilting over.  

By the time we got to the top of the climb (10,600 ft elevation) the temperature had dropped to 37F and I was soaking wet with perspiration.  

The next section of the course was a 24.6 mile, 5,500 foot descent to Cedar City.  At 2:00AM.  My crew helped me change clothing to deal with the windchill (easily in the early 20Fs) on the descent.  

About 10 miles into the descent, and at about 30 mph, I managed to thread the needle among the bloody remains (blood, bones, organs, front half carcass) of a huge deer that was killed by a truck less than an hour earlier.  

Five miles after that, at about 35mph, I had an explosive front tire blowout.  I managed to remain upright, putting my feet/cleats quickly to the road, creating a bright trail of sparks into the black of night.  

Replacing the front wheel we continued on down to Cedar City where I changed bikes (from my `climbing' bike, the Bacchetta Ti Aero) to my `rolling terrain' bike (the Bacchetta CA2).  

While we were doing this (3:30AM) another Hoodoo 300 racer without a crew asked if he could pile into the crew vehicle, as he was `toast' and couldn't ride another mile.  

I continued on for another 40 miles, 30 miles of which was more climbing, but at a more manageable angle (2% - 4%).  (I remember saying to Billy as he handed me a water bottle, "I could do without this damned climbing!!").  I asked him "What time is it?"  and he gave me the bad news: I had just over 2 hours left before the race clock stopped, regardless of when I got to the official finish line in St. George, Utah.  Realizing that I had no chance of doing the remaining 50 miles in the time limit I `called it.'  

There we were.  At the only gas station (closed, but it had bright overhead lights) for nearly 25 miles in all directions.  Two recumbent bikes, one upright bike and four spare wheels wrangled to the top racks.  Four tired guys, our gear, supplies, tools, etc, jammed tightly (but warmly!) into my Subaru Outback.  


I routinely use a `bobsled / luge' (YouTube Video) method of descending on long descents.  I developed this technique several years ago.  (Today I rode a descent that usually sees me doing 41 mph in a `lazy' luge but came up with a solid 47 mph (really, really tucked). 

On the HD300, descending down that killer hill I was in the luge the entire way.  But not to `go fast.'  I'm thinking that the `luge' position allowed me greater recovery and stability with that explosive blowout.  Instead of having to unclip both feet I only had to unclip the left foot.  The tiller position also helped me keep a low center of gravity.  Not to mention that the Ti Aero is `shorter' than the CA2. 

Looking at my Garmin 500 data on the descent from that mountain I kept it in the early 30's and late 20's all the way.  I was feathering the brakes all the way because 

  1. I knew I was tired, 
  2. the windchill was easily into the low 20's, maybe even teens, 
  3. critters (as noted with that deer carcass).  Most folks unfamiliar with such mountainous terrain at night will quickly nail a few deer or javelinas. 
The luge is useful only on extended descents (in the 20 mph range) mostly out of sense of comfort and safety (I don't have to look around my knees).  Or when it is safe to luge on a steep straightaway when I want to push the mph.  

I'm not really interested in exceeding 50 mph simply because of the safety angle.  No point to it. Sure I can probably push close to 60+ but ... at what risk. And any time saved at such speed is immediately lost within a few miles of normal road.  I'm just surprised at how safe and productive the luge position really is. 

So, if all holds together and I try it again next year, my training has to include more extended climbing (https://ridewithgps.com/routes/16331090).  I just ran out of steam on that climb out of Panguitch.  


Saturday, August 13, 2016

Two for Four

An out and back ride today. https://connect.garmin.com/modern/activity/1302322896

At the end of the `out' leg I stopped and had a tuna fish sandwich at a `hot' mini mart (Yarnell). Two guys in their 60's sitting at a table nearby. Both looked at me and the bike like I was from Mars. I offered to let both of them sit on the bike (Bacchetta Ti Aero). Both were chatty and friendly but neither took me up on the offer. Nice interchange with these guys.

At the end of the `back' leg I screamed up to my car (bottom of a hill) on the bike. Two guys were leaning on a nearby car having a smoke. They both looked at me and the bike like I was from Mars. I offered to let both of them sit on the bike. Both were chatty and friendly and BOTH took me up on my offer.

Great day on the bike. Made some friends.

Thursday, July 28, 2016

Tiller and Stem

With the Performer tiller and stem.   The stem is a hinge onto which the tiller is inserted.  For my bikes I've turned the `hinge' around so that there is a greater angle, allowing for a deeper angle of recline of the carbon fiber (Railgun) seat.  

When the hinge is turned around there it would otherwise rotate all the way to the ground.  To stop that from happening I tapped a screw hole in the base of the stem (see below).  I then inserted a strong screw with a nut and/or a few washers.  

The screw, nut and washers stop the tiller.  So that the screw, nut and washer doesn't hit the metal of the stem I've cut up some plumbing hose, stacked the pieces of the plumbing hose together and lashed it with some cable ties.  This cushions the screw so that it is not metal on metal.

I connected the stacked plumbing hose to the base of the stem.  The base of the stem turns with the tiller so there is no friction.  

I'm sure Henry Ford made even more bizarre contraptions before he hit on the right idea. 

Below you will find pics of the stem, tiller, screw and plumbing hose `bumper' for both the Bacchetta Ti Aero and the Bacchetta CA2.


Friday, July 15, 2016

Kent Polk Railgun CFHS Seat


Railgun on the Bacchetta Ti Aero  


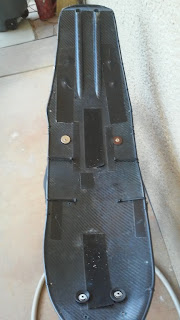
I modified the Railgun seat to eliminate the wide outward tapered flair (about 3 inches on each side) at the top.  (I used a dremel and just cut that part off).  My understanding is that the additional flair was to accommodate a CF compartment to hold `stuff' and bottles.  


The headrest is a key element on the bike.  Combine the steep angle of recline of the seat with the climbing of hills ... I need it.  (I want my head to be perpendicular to the plane of the ground.  This helps me deal with the issues of balance and forward sighting of the road (Training the Vestibular System).  I used lightweight PVC pipe, cable ties, a piece of Foam Plumbing Tube Pipe Insulation
and a short strip of Gorilla tape to lash it to my particular need.  


The Railgun seat on the Bacchetta CA2.


Saturday, May 28, 2016

HD300 - Analytics

  • How much climbing is there on this course?
  • Where does the climbing take place?
  • Is the climbing bunched up in only a few miles or is it spaced out?
  • Descending: where, how much, when?
  • Should my training be heavily weighted on climbing?  Descending skills?  Long hours of steady riding?
  • What kind of lights should I have?
  • Cold weather, rain?
  • Sweating makes for wet clothes.  What kind and how many?
  • Hydration?
  • Nutrition?
  • Cramping?
  • Where should I expect to lose / gain time? 
  • What will the long stretch of climbing do to my average MPH?
These are a few of the questions that need answers so that proper training and accomplishment can take place. 
CLIMBING:
  • There are 16,800 feet of climbing over the entire 300 mile course.
  • 80% (13,700 feet) of the climbing occurs within the first 191 miles. 
  • Though there is a `shock' climb of 13% grade at mile 13 of the HD300 it is only 3/4 miles long. Thereafter the climbing is more moderate.  Until mile 156. 
  • At mile 156 the grades become more steep (4% to 9%) and continue on that way for 31 miles.  An increase in elevation by 4,500 feet (to a top elevation of 10,600 feet).
So the most challenging part of the climbing starts at the halfway point of the event. 
DESCENDING:
  • In the last 95 miles of the event end there are 10,250 feet of descending. 
  • More than half (5,300 feet) of the descent takes place in the short distance of 26.7 miles (immediately after reaching the highest elevation).
  • The last 95 miles will take place in the dark of night, on empty and desolate roads.
  • Ambient temperatures will be in the 40F range.  When descending at speeds of 20 - 40 mph the windchill will drop that another 15F - 25F degrees.
  • Within this 95 miles there are another 3,100 feet of climbing. 
 STRATEGY:
From `the neck up' it is easier to do twelve 25 mile stages than to do one 300 mile stage.  
 
 TACTIC:
Two bikes.  One for climbing and one for descending and the flats. 
CLIMBING BIKE: 
  • Bacchetta Ti Aero
  • front double rings: 50/34t
  • Rear cassette: 36/11t
  • Railgun carbon fiber hard shell seat (Kent Polk)
  • Tiller and Zipp/SRAM R2C levers on a mini-bullhorn handlebar
DESCENDING AND FLATS BIKE:
  • Bacchetta CA2:
  • Double front gears: 58/42
  • Same rear cassette, Railgun seat, tiller, levers and handlebar
TRAINING:
I live in the Arizona mountains so it is a matter of choosing the `best' set of training courses.  Comparing the mileage, cumulative climbing and average feet of climbing per mile I've got excellent ("no excuses") training terrain. 


  • Failing to plan is a plan for failure. 
  •  Every time we breathe in and breathe out we get another chance.
  •  Action defines us.
  •  Behavior precedes awareness. 

Thursday, May 26, 2016

More on `Fear as a Motivator'

I'm cognizant of the fact that any writing that I do now about my preparation for an upcoming race in August (Hoodoo 300) will ultimately be read after the event.  I've written about past cycling challenges and have felt somewhat embarrassed or `odd' when later reading it.  

`Embarrassed' because I may have been too optimistic or too ignorant to do the proper training.  `Odd' because I wonder what it is about these things that gets me so engaged that it knocks my life off balance (family, work, etc).  

I was born a `psychologist.'  That is, I probably overthink everything.  Luckily I chose to make my actual profession that of a `psychologist,' as a practical defense against `stinkin' thinkin'.  Cognitive traps.  Emotional tail-chasing.  Too often this `defense' gets pretty weak and worn down.  

For the past few years I've focused a good deal of my training for `flat land' competitions.  The 6-12-24 Hour World Championship in Borrego Springs, CA.  The Bike Sebring 12 Hour race in Sebring, FL.  

I trained in the flat desert, 80 miles away and 4,000 feet below where I live in Prescott, AZ.  Why?  Because there are no recumbent cyclists up here!  And I wanted to `compare' my abilities with other recumbent cyclists.  Not to mention just for the company of other serious cyclists.  

Another important reason I targeted these events: safe roads.  Although there is a vibrant randoneurring community in Arizona many of the courses they use are dangerous.  Trucks, RVs, ATVs and other vehicles whizzing by on a 2 lane road with minimal shoulder at 80 - 85 mph.  Riding a recumbent bike on these roads is, in my opinion, even more dangerous.  

(I remember, on a randoneurring brevet near the Grand Canyon, climbing a 15+ mile 6% incline - south to Flagstaff on AZ 89 - with a 20-30 mile crosswind blowing me from a 12" shoulder into speeding trucks and cars.  Navigating the crosswind, the rumble strips ... I finally just stopped and hitch hiked to the top.  Live another day.)

Now that I've chosen to compete in an event that takes place on safe roads, in the Utah mountains, over 300 miles, with 17,000 feet of climbing - all within a time limit of 24 hours - I am not allowing myself any excuses if I do poorly.  After all, I live in the Arizona mountains; the perfect training terrain for this event.  

THE RACE PLAN:

It is more psychologically feasible to race twelve (approximately) 25 mile stages than to race one 300 mile stage.  As well, breaking the race event into 12 stages allows me to train specifically for each particular stage.  

For example, stage seven is 32 miles long with 4,500 feet of climbing.  That is a `huuuge' amount of climbing in such a short space.  

The very next stage, stage eight, is 27 miles long with 5.300 feet of descending.  (In the dark of night, from an altitude of 10,500 feet above sea level to 5,750 feet above sea level).  Reaching speeds in excess of 40 mph, for long stretches, is an almost certainty.  A `certainty' that carries with it serious risks (mechanical failure, hitting critters on the road, road surface problems, windchill and frostbite). 

THE TRAINING PLAN:

The 300 is a valid competitive challenge.  Not `too easy.'  Not `too hard.'  Right in the target zone for me.  No excuses.  I live in the perfect training terrain.  And that is sobering.

I'm training now in a way that I've never trained before.  My training courses simulate both the climbing and descending of the 300.  I've broken the training courses into discrete sections that I am timing.  Each segment will serve as a baseline against which I will attempt to improve on each time I train on that course.  

THE TYRANNY OF TRAINING:

I can make myself miserable when I set a goal that requires disciplined and difficult training.  Worse, I can make those around me even more miserable ... because of how I act when I feel miserable.  
I don't know, yet, quite how I am going to not go off the deep end in the training process over the next three months.  But I will be making it a priority to remain mindful of my mood, of not feeling `rushed' and unwilling to relax, to be patient and `smell the roses.'  

No doubt I will have more to `blog' about this process.      

Friday, May 20, 2016

INGESTIBLES FOR CREW SUPPORTED LONG-DISTANCE CYCLING

O.K. My special ingestIbles on long-distance crew-supported cycling competitions:

Foodstuffs: ((Little sandwiches. Smashed tight so that they can be easily grabbed, quickly eaten and swallowed.)
-white bread
-peanut butter
-mayonnaise
-tuna fish
-pickle relish
(Little balls of ...)
-Avocado
-Brown rice
-Peanut butter


Fluid
-Maltodextrin powder
-Whey protein powder
-Water
-More water: not when I'm `thirsty,' but on a regular schedule


Minerals
-Endurolyte (electrolyte) pills
-Magnesium pills
-Potassium pills


Medical
-The occasional ibuprofin
-Tums


NO ENSURE PRODUCTS AT ALL, EVER, FOR ALL TIME, IN PERPETUITY AND FINALLY .

Yarnell Grade, Mountain Training ... and Balance In Life

I could write an incomprehensible book on this subject. 

Over the past week I've `psychologically inoculated' myself against early season doubts about my capacity for riding up mountains and long grades.

Here are two videos of the descent down Yarnell Grade.  The first one is on May 18th in a car.  The second one is on May 19th on my Bacchetta Ti Aero recumbent bike.
  1. Descending Yarnell Grade - Car
  2. Descending Yarnell Grade - Bike   

Though I had planned to do a 34 mile, 3,300 foot training ride today ... my body is telling me to rest. 

And that is the hardest thing to gauge in terms of training: balance.  Balance as it relates to performance improvement; balance in terms of the rest of  my life: family, work, social activities and just simple `relaxation.' 

More on this topic over the next several weeks and months.   

Saturday, May 14, 2016

Ride Report - Mt Lemmon

Living in the American Southwest offers great opportunities for challenging cycling.  From grim, hot desert to mountainous terrain.  

The Greater Arizona Bicycle Association (GABA) sponsored a supported (SAG stations and vehicles) ride up Mt Lemmon, just northeast of Tucson.  Excellent road and mostly good weather in Spring makes for a great one day cycling challenge.

At this point I'm training to enter the Hoodoo 300  in late August of 2016.  I live in a mountainous area in Arizona (Prescott) so I have the perfect training ground for the Hoodoo 300.

The Mt Lemmon ride constitutes about 30 miles of almost non-stop climbing for an approximate total of 6,000 feet.  An average 5.6 degree grade, with a few 12's and 13's thrown in.  

Starting on Friday the 13th, at 7:10AM, I pedaled 25.8 miles and 5,600 feet to the top.  All was going well until I hit the first descent of the climb.  Flying down a short 150 meter hill at 42 mph I heard a loud `pop' and immediately unclipped my feet from the pedals and began feathering the brakes.  I managed to maintain control of the bike and come to a safe and sudden stop just as the hill was tipping up again.  The front tire.  

Popping the wheel from the frame I inspected it very carefully for tire rip.  I pulled the tube and noted a tear.  Matching the tear to the tire location ... nothing.  The tire looked solid.  I concluded that all I needed to do was to put in a new tube, inflate it and get back on the road.  

Not.  When I inflated the tube I checked the tire again and again, disbelieving my first inspection.  And there it was: a small tear just at the wheel rim. 

I usually carry a spare tire when training at home.  But, since this was SAG supported I didn't bother to bring one.  My ride was over.  Descending Mt Lemmon on that tire would certainly have resulted in tragedy.  

Despite the fact that it was Friday the 13th I was extremely lucky to have that tire blowout before I started my way down the mountain.  Descending at 35 - 50 mph on mountain switchbacks ... certain death.  I imagined myself making a sharp descending turn, the tire blows, the bike goes out from under me, I slide into the oncoming lane ... and under the wheels of a car or truck.  

The GABA SAG vehicle, driven by `Bob,' rolled by within 5 minutes.  He put my bike on his rack and shortly I was heading down the mountain to the starting point.  

THIS is a link to a short video that I took at the top of Mt. Lemmon.  It was the `penultimate' SAG stop about 5 flat miles from the end of the ride.  

And THIS is a link to the Ride With GPS metric of the ride.  


Sunday, May 8, 2016

Luge - Minimizing Wind Resistance on Long Descents

This descending method minimizes wind resistance without the use of special gear (fairing, aero bars, etc). 
Riding a Bacchetta Ti Aero recumbent with a tiller and Railgun (Kent Polk) carbon fiber hardshell seat at a 11 degree angle of recline. 
The technique involves extending both feet parallel to the ground. One foot (left) remains clipped in. The other foot is unclipped. Right leg extended with calf resting on right pedal crank. 

Note the video of the descent, below.
This is a picture of the Bacchetta Ti Aero bike. 
  • Tiller steering
  • Zipp R2C levers
  • Railgun carbon fiber hard shell seat at an 11 degree recline. 
  • 650 Zipp wheels
  • 650 x 23 tires

Friday, May 6, 2016

Recumbent Gearing in the Mountains

The steepness of climbing and the overall amount of climbing that I do in the hills and mountains determines which bike I use.

The Bacchetta Ti Aero has 650 wheels.  I've set it up with a double (50/34) up front and an 11/36 ten speed SRAM cassette in back.  This is the bike I use if the course has inclines greater than 6% for long stretches.

The Bacchetta CA2 has 700 wheels.  I've set it up with a 58/42 up front and an 11/36 ten speed SRAM cassette in back.  This is the bike I use if the course has less steep inclines.  As well, on the descents I can continue to apply power for longer before I spin out (i.e., pedal RPMs greater than 110 or so).

The chart below illustrates how many forward inches is gained with every turn of the crank by bike.

Gear InchesKEY: With every complete turn of the crank the THIS is the number of inches the bike is moved forward.
175 mm crank
23-622 tire
SRAM 11-13-15-17-19-22-25-28-32-36 10-speed Cassette
 
TI
CA2
 
 
TI
CA2
 
Wheel
650
700
 
 
650
700
 
 
50
58
 
 
34
42
 
11
111
139
125%
 
75
100
134%
13
93.5
117
125%
 
64
84.9
133%
15
81
102
125%
 
55
73.6
134%
17
71.5
89.7
125%
 
49
64.9
134%
19
64
80.2
125%
 
44
58.1
134%
22
55.3
69.3
125%
 
38
50.2
134%
25
48.6
61
126%
 
33
44.2
134%
28
43.4
54.4
125%
 
30
39.4
134%
32
38
47.6
125%
 
26
34.5
134%
36
33.8
42.3
125%
 
23
30.7
133%